Sidor

Saturday, September 21, 2019

Elsa's shawl


I'm releasing a new pattern today. You can find it in my Ravelry shop.

It's a shawl made for my daughter. I was admiring some handdyed merino yarn at a craft fair, and she more or less told me to make her a shawl in this colour. Who was I to refuse, right?

The pattern is available in US English and Swedish. It contains written instructions and charts for the different parts.


It feels like a huge step to actually sell a pattern. But I figured that some of my patterns have taken a lot of time and thought to construct so those I could sell without feeling too greedy. I only have a part time job and a massive yarn addiction to finance so if I could earn a little on my hobby too, that would be great.

I have had help testing this pattern, so I hope it's clear and easy to understand. Let me know if you need any help!

Love, Nilla.

Sunday, September 1, 2019

Ragdoll blanket


This is one of those precious tadah-moments! Yay! I have not only finished a very cosy blanket, I also have written down the pattern for you. A bit hastily, I have to admit, so pleas do tell me if you find any mistakes. You will find links to the pattern in English (US) and Swedish at the bottom of this post.

This pattern came to me one morning before work. I was having breakfast and scrolling through Instagram. I saw a picture of a beautiful knitted blanket with mitred squares. I started thinking about a crochet blanket with squares made from rows, not rounds. Would it be possible to even make it continuous? Just imagine having the squares but virtually no ends to fasten. I scribbled down a schematic idea of a pattern and sat down to test it after work. Well, the idea worked!

This blanket consists of squares made of dc rows. It is made diagonally, starting in one corner and ending in the opposite corner. If you felt your yarn together or use Russian join to add the next ball (or if you have a huge ball of yarn...) you will actually end up with only two ends to fasten! Isn't that glorius? Actually, if you are okay with crocheting over your ends and you make the border, you could end up with only one end!


I thought that this pattern would be enhanced if I used self striping yarn, that would change colour often enough to make each square somewhat stripey. So I went yarn hunting, and ended up with Incawool from Hjertegarn. I have used this yarn before and I like it a lot. It's an aran wool yarn with 160 m on 100 g and it's available in both print and single colour. I used both since I didn't want the border in more than one colour. It turned out the stop didn't have enough balls of the print I chose, so I used my border yarn for two of the diagonals. You almost can't tell.

The blanket has a scruff look to it, since I prefer to use a large hook when I make blankets (9 mm in this case), and since there will be gaps between stitches and the squares won't always look so square. But I like that. Everything doesn't have to be so perfect or even neat. And it works well with this yarn too.

So do you have to use aran wool and 9 mm hook? No no, you really don't! You could make this blanket in any yarn. You could make it with bigger squares or smaller. I would use a bigger hook than recommended for the yarn though, since I believe a blanket should be soft and draping, not stiff and hard.


I do hope you will enjoy this pattern if you make your Ragdoll blanket. Do tell me if something is unclear or if you find mistakes. And I would love to see your blanket!

If you want to check it out on Ravelry for size and other information I might have forgotten here, then here is the link!


Love, Nilla!

Sunday, March 31, 2019

It looks like spring

Hi! Long time no see, right? However, I doubt that anyone is in here regularly looking for an update. But if you actually have been here before, maybe you notice some changes? There's been a little face lift, but the big thing is that I've changed the name of the blog. Not very thought through I'm afraid. Now, old links to my blog don't work anymore. I think I've managed to redirect everything from my social media and Ravelry. And even though I might loose some traffic from links to old patterns floating around in the web, this feels really good. You know, this blog started in Swedish with no other intent than trying to find myself and what I liked doing. And now that it has turned into a craft blog, I guess my first mission is accomplished and I'm going all the way with being an internationally read crafter. However, I have never deleted any posts, my whole journey is still here.

Enough about that. The real reason I'm here is that I have a brand new pattern to share with you. Yay! It's a shawl that I hooked up a few days ago. That was the easy part. Writing pattern is tricky if you ask me. I want a pattern to be clear and easy to understand, but also fool proof. I'm afraid I didn't really succeed on the last part. It will help if you are used to reading patterns. I could make it clearer, but it takes so much time and I'm ready for new adventures with my hook now.


The name of the pattern is not very typical for a shawl. It's called "It looks like spring". I found it hard to come up with a name for it and asked for help on social media. Someone wrote "It looks like Spring" and that sentence stuck. Spring hasn't come very far where I live, but it's getting there. And the colors in the shawl is inspired by last years dead grass, dry oak leaves and bare branches, but also by the first flowers emerging here and there. Not very pink yet, more snowdrops and such, but sometimes the design has it's own life and you only get to tag along.

As usual, I have written the pattern in Swedish and English (US terms). Nobody has tested the pattern for me (I get far too impatient to wait, I want to share it immediately) so I hope it's not full of mistakes. Please, if you find one or if something is unclear - tell me! I want it to be comprehensible of course, and I love to help. No use sharing a pattern if noone can use it, right? So do me a favour and tell me.


Svenska
Uppdaterad
2 april - misstag på rad 17-19
4 april - rad 30

English (US)
Updated
April 2 - mistake on rows 17-19
April 4 - row 30


Please share your shawl on the pattern page on Ravelry! I'd love to see it.

I hope you will have fun making this shawl!

With love,
Nilla K

Wednesday, July 25, 2018

Rainbow Baby Blanket


Hello there! 

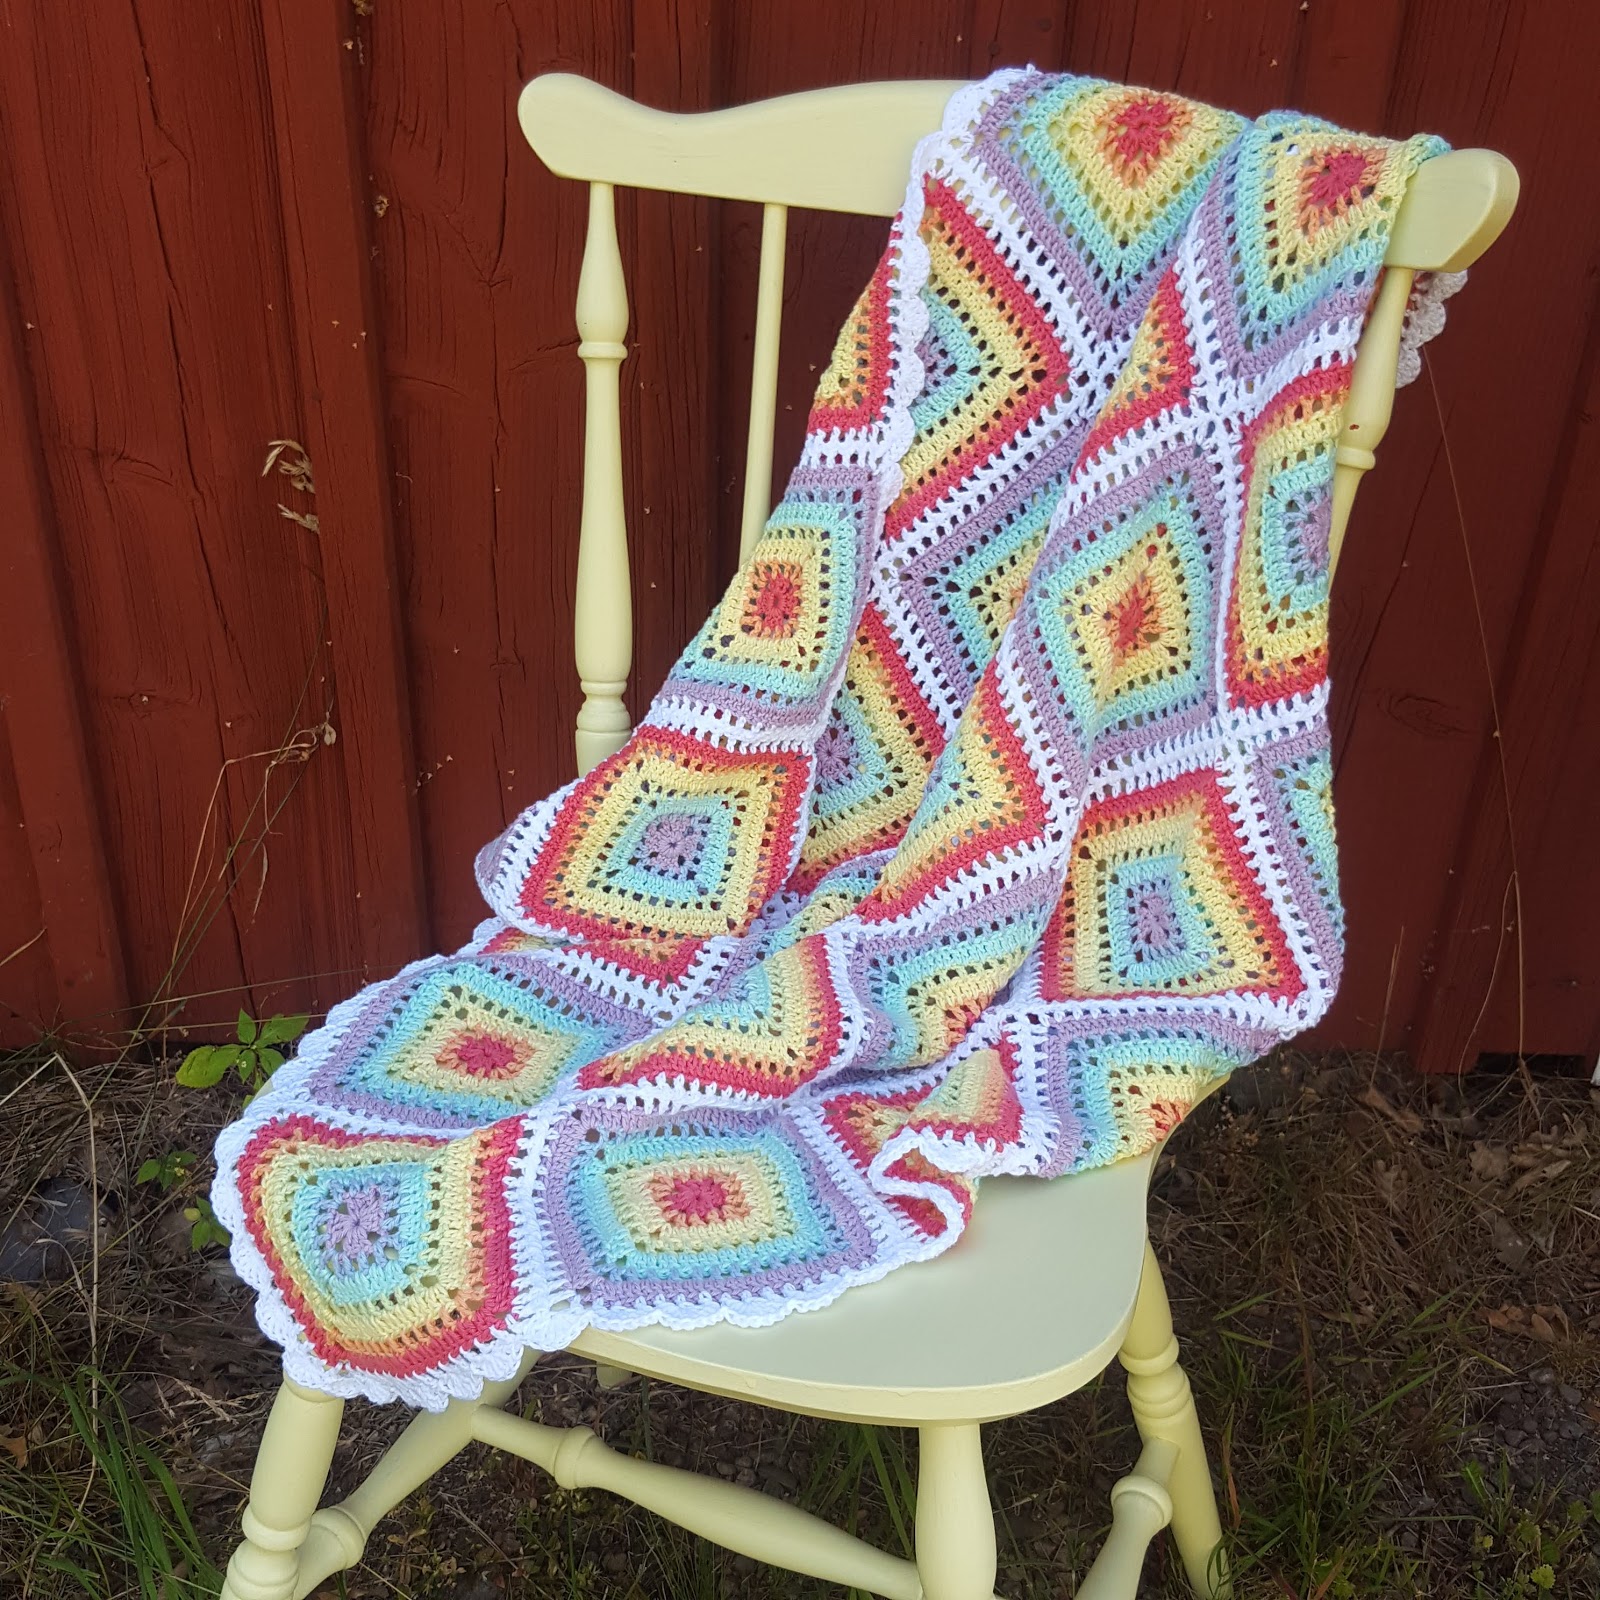
I'm a bit excited to show you this Rainbow Baby Blanket. Do you recognize the square I've used? Yes! It is the Simple Square. I fell in love with this square in rainbow colours, and wanted to make something pretty with it. And dare I say I succeeded?

Well, let's get into the details, shall we? If you would like to make one of your own.

Yarn, size and hook

I used a Swedish yarn called Järbo Nova. It's a sport weight cotton yarn with a yardage of 186 yards (170 m) per 50 g, but you can use any yarn you like really. 

I wanted my baby blanket to end up about 75 x 75 cm in size, and since my squares landed on almost 15 cm each, I made 25 squares for this blanket. 13 in rainbow colours with coral last round, and 12 in reversed rainbow colours with lilac last round. I placed the squares as you can see in the picture below, alternating coral and lilac squares with coral squares in the corners and in the center.


The colours I used was coral, light orange, light yellow, light green, light aqua, light blue, lilac and white. I used one ball of each, except the coral and white where I needed two 50 g balls. I didn't use much of the second coral ball though, I only needed it because of the 13th coral square.

I used a 3,5 mm hook. Rather go up than down in size of the hook. A blanket shouldn't be stiff but have some drape and softness to it, don't you think?

Squares

So, let's get to the pattern. To make a simple square, follow the link to the Simple Square above and you will find the written pattern, a chart, and detailed photos. 

Please note that I've made one more round than I did in the square pattern. The eighth round is made in white. I made this round for joining, and is used for joining as you go. 

In other words, make all your rainbow squares, but wait with the white round until you are ready to join your squares. 

Joining

On the first square you make a white round according to the pattern. Cut the yarn and weave in ends, unless you want to save that for later.


On your second square, start the white round according to pattern and crochet on three sides of your square. You will use the fourth side for the join.

Make the first two chains of the corner. Release the hook from the loop. Then stick the hook through the corner of your first square, from above, and catch the loop again. 


Pull the loop up through the corner of the first square, and ch 1.


Continue with a dc in the corner space of your second square.


Make a chain.


Release the hook from the loop and stick the hook through the next ch-1 space on your first square. Catch the loop again, and pull it through the space.


Make a dc in the next dc on the second square. Ch 1, release hook, insert hook in next ch-1 space, catch loop and pull through.


Continue like this all the way up on the fourth side. You make each dc according to the pattern, and stick the hook through the first square after each ch.

When you have made the last dc of the round in the corner space, ch 2, release hook, insert hook through the corner on the first square, catch loop and pull it through the chain space. Ch 1 and join with a sl st to the third ch in the beginning of the round.


Now you have your first square to the right and a second square on its left side. The third square is joined on the left side of the second square. Keep adding squares on the left side of the row until you have made the short side of the blanket as wide as you want it. In this case, that was 5 squares long.

Now it's time for row two on your blanket. As with the first row, you crochet the white round on the first three sides on your square, and use the fourth for the joining. You make the join exactly like the former joins, but this time you join your square to the top of the very first square.


The second square on row two goes on the left side of the first square on the row, which also means it needs to be joined to the top of the second square of row one. The rest of the squares on this row will be joined on two sides.

Take your next square, and make the white round on two sides. Use two sides for the joining.


Now, start joining your square on top of the first row. On the picture above, that would be on top of the coral square.

Don't be confused by the colours. We started with a coral square in the right corner of row one. On the picture you can actually see row two and three, since I had already worked a bit on the joining before I started taking pictures for this post.


Make the join like before, until you reach the corner.

Make the dc in the corner of the square you are joining as usual, then ch 1. Release the hook and stick it through the corner of the square on the finished row below your current square.


Pull loop through the corner and ch 1. Now, release the hook again and stick it through the corner on the square to the right of the square you are joining.


Pull the loop through the corner and ch 1. Make a dc in the corner of the square you are joining and keep going as usual.


Keep adding squares to your rows, and rows to your blanket until all squares are joined to each other. Fasten your ends if you haven't already, and get ready to make the border.

Border

I chose to make a simple border, inspired by little clouds to go with the rainbow theme. 

Join the yarn for the border with a sl st around the ch-1 before the third dc before the corner space on any side of your blanket. 


Skip the next dc and ch-1 space, make 6 dc's in the next dc.


Skip the next ch-1 space and make a sl st in the next dc. This should be the dc in the corner of the square.


Make 4 dc's in the second ch in the corner. Note that we make the stitches IN the chain, not around it.


Sl st in the next dc. Skip the next ch-1 space and make 6 dc's in the next dc. Skip the next ch-1 space and dc, and sl st in the next ch-1 space.

This is your first corner made. You will make the rest of the corners just like this.


Now, on the sides you will always skip two stitches. A dc and a ch-1 space, or a ch-1 space and a dc, like this:

Skip the next dc and ch-1 space, and make 6 dc's in the next dc.

*Skip the next ch-1 space and dc, and make a sl st in the next ch-1 space. Skip the next dc and ch-1 space, and make 6 dc's in the next dc.*

Repeat from * to * until there are only 3 dc's left on the side, then make a corner as described above. Repeat for all sides and corners.

When you reach the first corner you made, join with a sl st to the first sl st made.


If you want to, you can block the finished blanket.  I have to admit that I don't block my blankets unless I feel I really have to. Apparently, I didn't feel I had to in this case, as you can see it's not entirely straight. But it looks alright to me. Everything doesn't have to be perfect, and a blanket is made to be used and stretched out, not for lying in a perfect square shape on the floor.


And tadah! Here is the finished blanket! Weave in those last ends and it's all done and ready to be wrapped around a gorgeous baby.


An upgrade to this blanket would be to figure out a continuous join. I did not enjoy fastening 50 more ends. If I come up with one, I promise to share it with you. I blame the current heat wave here in Sweden for not being able to think clearly enough to figure it out.

I hope you enjoy the pattern. If you find any mistakes or if you have a question, please feel welcome to contact me! I would sincerely appreciate it.

With love,
Nilla K

Sunday, July 1, 2018

The Simple Square pattern


Hi there!

Nice to see that you have found your way to my blog. It's been very qiuet here for a long time now, but hopefully that's about to change. It's funny that my last post was about craving creativity, longing to design my own patterns. Because right now, my head is bursting with ideas, and I hope to share som new crochet patterns with you in the near future.


Today, I have a square for you. It's simple regarding its construction, but it's so much fun! It has a lot in common with your regular granny square. The pattern is easy to memorize, and you can play all day long making it in different colour combinations. You can do that with any square of course, but since this one is so simple in itself, the colours truly make all the difference.


The square in my tutorail is rainbow coloured, like the one on the left in the first picture. But you can make it in any size and any colour you like. Take a look at all the fun I've had, and hopefully you will get inspiration. Or maybe you came here with an idea? I'd love to see it! This crochet pattern is now found on Ravelry too, and I'd love you to link to it in your project.


The pattern is shared below both written and as a chart, but if you prefer a pdf with more pictures of the process, or if you want it in Swedish, here are your links:

Svenska

English (US terms)


As you can see, I've made this square in a lot of different yarns and sizes. So just pick a yarn you like, a hook in the recommended size, and get going!


About the pattern

You can repeat the last two rounds as many times as you want, to make the square the right size for you. I have made the rainbow square from the tutorial in the yarn Järbo Nova with a 3,5 mm hook, and I made it in seven rounds. It meassures aprrox. 12 cm.

Every round starts with a ch 3, which counts as the first dc. The round is always finished with a sl st in the third chain of the beginning ch-3.

I have chosen not to mention when you should cut the yarn and fasten the end, since that depends on how often you choose to make a colour change. However, I have written the pattern as if you change every round, or after each odd round. You can certainly make less changes, but then you will have to figure out where in the pattern you start and end each round.

I use US crochet terms.

Abbreviations:
Ch - Chain
Dc - Double crochet
Sk - Skip
Sl st - Slip stitch
St – Stitch

Pattern

Ch 5, join with sl st in the first ch to form a ring.

Round 1: Ch 3 (first dc), 2 dc in ring, *ch 3, 3 dc in ring*. Repeat from * to * two more times, ch 3. Join  with sl st to ch-3.

Round 2: Join yarn in any ch-3 space. Ch 4 (first dc + ch 1), *dc in next dc, ch 1, sk 1 st, dc in next dc, ch 1, (dc, ch 3, dc) in ch-3 space, ch 1*. Repeat from * to * two more times. Dc in next dc, ch 1, sk 1 st, dc in next dc, ch 1, (dc, ch 3) in ch-3 space. Join  with sl st to third ch in ch-4.

Round 3: If you use a new colour, join yarn in the first dc on any side. Ch 3 (first dc), *dc in ch-1 space, dc in dc* repeat from * to * until you reach the corner. *Make (2 dc, ch 3, 2 dc) in ch-3 space. Dc in every dc and ch-1 space until you reach corner.* Repeat from * to * two more times. Make (2 dc, ch 3, 2 dc) in ch-3 space. Join  with sl st to ch-3.

Round 4: Join yarn in any ch-3 space. Ch 4 (first dc + ch 1). *Dc in next dc, ch 1, sk 1 st; repeat until you reach last dc before corner, dc in last dc, ch 1, make (dc, ch 3, dc) in ch-3 space, ch 1.* Repeat from * to * two more times. Dc in next dc, ch 1, sk 1 st; repeat until you reach last dc before corner, dc in last dc, ch 1, make (dc, ch 3) in corner. Join  with sl st to third ch in ch-4.

Round 5: Repeat round 3.

Round 6: Repeat round 4.

Round 7: Repeat round 3.

Keep repeating  round 4 and round 3 if you want to make a bigger square.

I hope this inspires you to beatiful makes!

And if you do find something off about the pattern, or if you have questions, please let me know!


Tuesday, May 31, 2016

Aching for creativity

I sometimes  wish that I was more creative. Or more talented. At least better at design. At times I long desperately for inspiration for something really beautiful, something that isso me and that I have designed. Unfortunately, I am really terrible at picturing things in my mind. The imagined object is really blurred and I have no idea gow to make it. But it almost aches, this craving for creativity. 

I love flowers. And I love making afghans. I want to get this brilliant idea of a flowery afghan that is all my design. And really pretty too. 

I got this idea that I could try c2c (corner to corner) crochet and make something pretty. I was all fired up, but forced myself to at least try the technique once before I got carried away. Well, it wasn't hard, and quite fun to make. But oh my, all those ends to fasten!


This is what I made. A simple flower, 4 colours and 10×10 pixels. And I got 14 ends to fasten. 14!!! I usually crochet over the ends as often as it's possible, since I hate weaving in those ends. And I can only imagine how many ends there would be on a big afghan. So I guess my mind will go on searching for the ultimate design idea. And the rest of me kind of longs for this mood to shift.

Friday, May 27, 2016

My Sophie's Universe

May I introduce Sophie's Universe CAL 2015


This, my friends, is the first crochet afghan I ever made. I saw it on Instagram, and it was love at first sight. I got started the same day! And I enjoyed it so much. I crocheted in an insane speed. It took me a month and a half to finish it.

I made it a year ago, but I never blogged during that period. I have more things to show you that might be new to you but not to me, so to say.


It is remarkably varied, there are new stitches and techniques the entire time. It's so hard to take a fair picture of it since you loose all the details.


I made mine in cotton, with a 3,5 mm hook if I remember it right. It's soft and cosy, and I use it almost every day.

 I didn't have a colour plan, just used what I had in my basket, and decided each round when I was there.

Take a look at some of the details! The squares to make it rectangular, the center flower, a flower shaping a corner and a row of tulips.


Another row of tulips, an amazing flower, another flower forming another corner, and a row of roses. Possibly my favourite part.

I keep it on our bed, and I spread it out so you can get a clue about the size. The bed is 1,8 m wide.


I always thought that I lacked the patience to crochet a afghan. Turns out you don't need all that patience, you just need to find the right pattern!